ここでは,InventoryManagementのAlloyによる仕様記述の課題に取り組んでいただきます.
以下にAlloyで記述されたInventoryManagementのモデルを示します.こちらを適宜参照しながらモデルの理解を行ってください.
sig
以下のモデルでは始めに,商品IDの集合を表す ItemId と商品名の集合を表す Name を宣言しています.
次に,商品全体を保管する倉庫の集合を表す Inventory を宣言しています.Inventory には,ItemId から
商品情報を表す Item への対応関係がitemDB フィールドとして定義されています.
最後の Item では,商品名を表す name が Name のインスタンスとして,
在庫数を表す count が Int
pred
最初の述語として記述されている init は,Inventory の
インスタンスである its が初期化されているという条件を満たしていることを示しています.
次の,itemRegistration は itemId で示された商品を登録する前の Inventory のインスタンス its と
登録した後のインスタンス its' の関係を述語として定義しています.
ここで quantity は初期数量,n は商品名を示しています.
receivingOrShipping ではitemId で登録されている商品に対して
入荷か出荷を行った際の操作前の Inventory のインスタンス its と操作後のインスタンス its' の関係を述語として定義しています.
ここで quantity が正の値のときは入荷,負の値のときは出荷を表しています.
最後の execute では,init ,itemRegistraction ,receivingOrShipping を
この順で呼び出す操作を定義しています.
runexecute を呼び出して実行を行います.
この実行の際に,Int で8bitの数字を扱うことができるよう末尾に
sig ItemId, Name{}sig Inventory { itemDB: ItemIdlone ->lone Item }sig Item { name : Name, count:Int }pred init[its: Inventory] {no its.itemDB }pred itemRegistration[its, its': Inventory, itemId: ItemId, quantity:Int , n: Name] {some it: Item | {no itemId2: ItemId | its.itemDB[itemId2] = it its'.itemDB = its.itemDB + itemId -> it it.name = n it.count = quantity } }pred receivingOrShipping[its, its': Inventory, itemId: ItemId, quantity:Int ] {some it': Item | {no itemId2: ItemId | its.itemDB[itemId2] = it' its'.itemDB = its.itemDB ++ itemId -> it' it'.name = its.itemDB[itemId].name it'.count = plus[its.itemDB[itemId].count, quantity] } }pred execute[] {some disj its, its', its'': Inventory, itemId: ItemId, n: Name | { init[its] itemRegistration[its, its', itemId,100 , n] receivingOrShipping[its', its'', itemId, -50 ] } }run executefor 2 but3 Inventory,8 Int
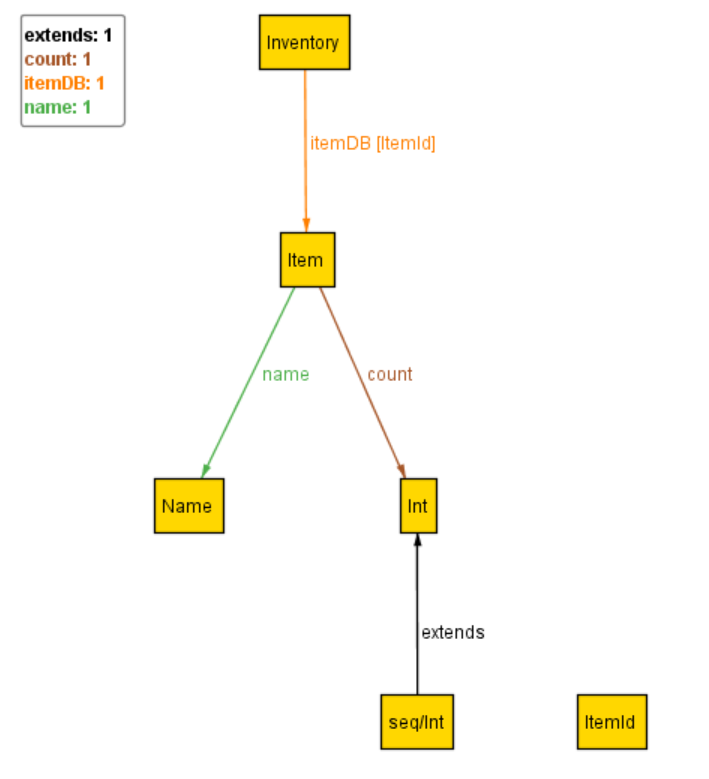
先ほどのInventoryManagementのモデルの構造を,Alloyの可視化ツールを使用して,可視化したものを以下の図に示します.

この図がモデルの実行に依らない,モデルそのものが持つ構造を表していることに注意して下さい.
Inventory が,ItemId のインスタンスを Item のインスタンスに対応させる itemDB という
フィールドを持っており,Item が Name のインスタンスを参照する name フィールドと,
Int のインスタンスを参照する count フィールドを持っていることがわかります.
ここでは,InventoryManagementモデルの仮想実行について説明します.InventoryManagementの仮想実行で用いるテストケースは次の通りです.
このテストケースはモデル中の execute 述語で実装されています.
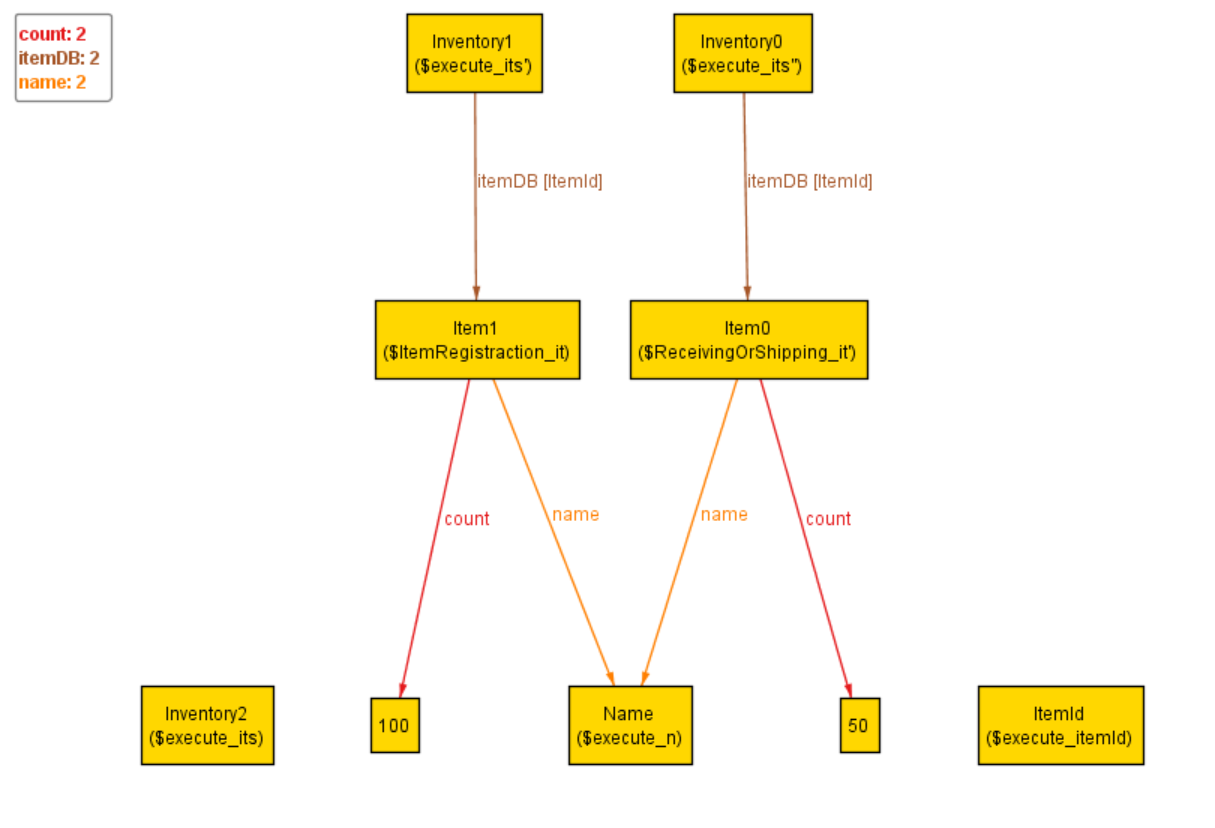
execute の仮想実行を可視化したものを以下に示します.

左下にあるInventory2($execute_its)は execute 述語中の変数 its で参照される Inventory のインスタンスであり,
init 述語を満たしているため,まだ何の商品(Item)も登録されていない状態になっています.
次に,1番上の段の左にあるInventory1($execute_its')は変数 its' で参照されるインスタンスで,
its で参照されるインスタンスに対して itemId で参照される Item のインスタンスを初期数量100個で登録したインスタンスになっています.
そして,Inventory1の右にあるInventory0($execute_its'')はitemId で参照される Item のインスタンスを50個出荷したインスタンスになっているため,
在庫数が50個に減少しています.
ここで出荷前の Item のインスタンス(Item1)と出荷後のインスタンス(Item0)が別々のインスタンスになっていることに注意して下さい.
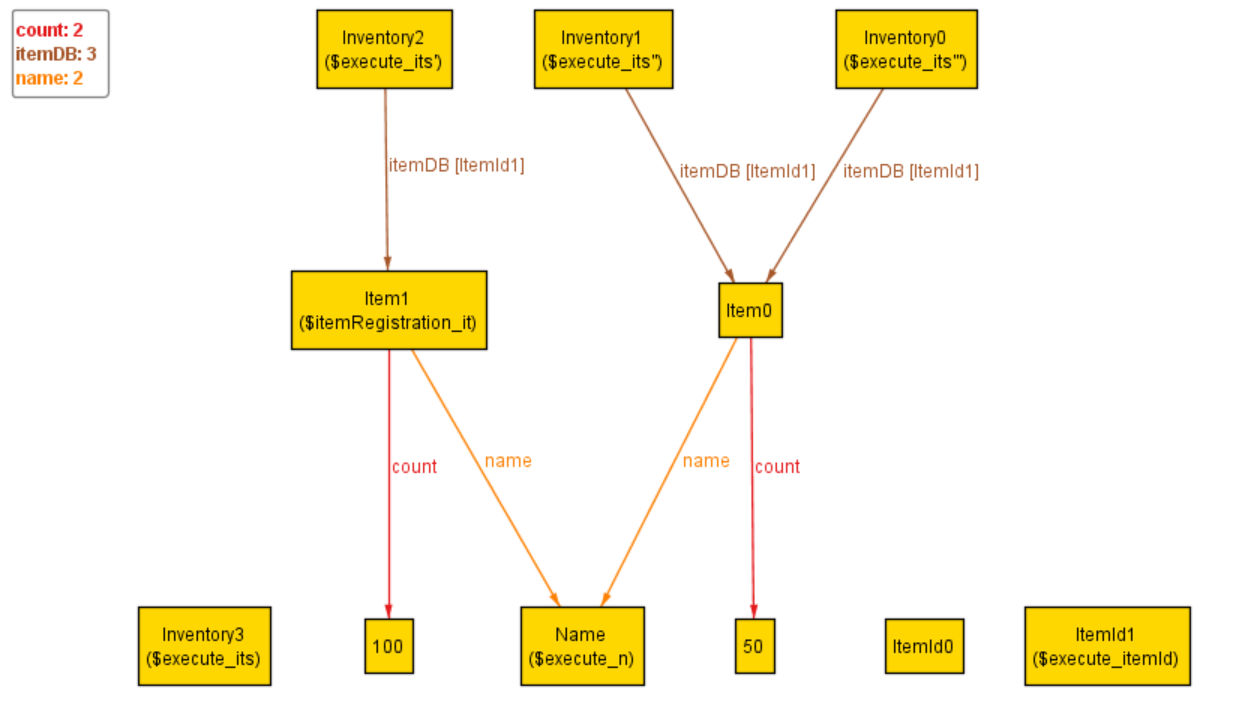
本課題ではまず,上記にて説明を行ったInventoryManagementに,ある機能を追加したモデルとその仮想実行を可視化した以下の図を見ていただき,
2つの設問に答えていただきます.
必ず設問1,設問2の順番でご解答下さい.
以下の図は設問のページにも記載されているページにも記載されているのでこのまま設問のページに飛んでいただいてもかまいません.
sig ItemId, Name{}sig Inventory { itemDB: ItemIdlone ->lone Item }sig Item { name : Name, count:Int }pred init[its: Inventory] {no its.itemDB }pred itemRegistration[its, its': Inventory, itemId: ItemId, quantity:Int , n: Name] {some it: Item | {no itemId2: ItemId | its.itemDB[itemId2] = it its'.itemDB = its.itemDB + itemId -> it it.name = n it.count = quantity } }pred shippingOrReceiving[its, its': Inventory, itemId: ItemId, quantity:Int ] { plus[its.itemDB[itemId].count, quantity] <0 implies {all itemId': ItemId | its'.itemDB[itemId'] = its.itemDB[itemId'] }else {some it': Item | {no itemId2: ItemId | its.itemDB[itemId2] = it' its'.itemDB = its.itemDB ++ itemId -> it' it'.name = its.itemDB[itemId].name it'.count = plus[its.itemDB[itemId].count, quantity] } } }pred execute[] {some disj its, its', its'', its''': Inventory, itemId: ItemId, n: Name | { init[its] itemRegistration[its, its', itemId,100 , n] shippingOrReceiving[its', its'', itemId, -50 ] shippingOrReceiving[its'', its''', itemId, -75 ] } }run executefor 2 but 4 Inventory,8 Int

課題アンケート (別タブが開きます)
課題終了後の評価アンケート (別タブが開きます)