ここでは,Alloyを用いて記述したInventoryManagementの課題について説明します.
以下にInventoryManagementのモデルを示します.こちらを適宜参照しながらモデルの理解を行ってください.
sig
以下のモデルでは始めに,商品を識別するためのIDを表す ItemId と商品名を表す Name を集合として宣言しています.
次に,商品全体を管理する倉庫を表している Inventory は,itemDB フィールドを持っています.
このフィールドを定義している行では,itemDB フィールドが ItemId から,
商品の情報を表す Item との対応関係を参照していることを表しています.
最後の Item では始めに,商品名を表す name を Item の要素と,Name の要素の間の関係として定義しています.
次にある,在庫数を表す count では在庫数を Int
pred
以下のモデルで最初に記述されている init は,Inventory の
構造を持った its 初期化するという操作になっています.
次の,itemRegistraction では初めて取り扱う商品を入荷する際に,
商品名と入荷数量を Inventory に登録するという操作になっています.
その次にある, receivingOrShipping では登録されている商品に対して
入荷か出荷を行った際に起こる数量の変化の操作を表しています.
最後の execute では上記にて説明を行った,
init ,itemRegistraction ,receivingOrShipping を
上から順番に実行を進めるという操作になっています.
そして,最後にある runexecute を呼び出して実行を行っています.
この実行の際に - の数字を扱うため,
末尾に
sig ItemId, Name{}sig Inventory { itemDB: ItemIdlone ->lone Item }sig Item { name : Name, count:Int }pred init[its: Inventory] {no its.itemDB }pred itemRegistration[its, its': Inventory, itemId: ItemId, quantity:Int , n: Name] {some it: Item | {no itemId2: ItemId | its.itemDB[itemId2] = it its'.itemDB = its.itemDB + itemId -> it it.name = n it.count = quantity } }pred receivingOrShipping[its, its': Inventory, itemId: ItemId, quantity:Int ] {some it': Item | {no itemId2: ItemId | its.itemDB[itemId2] = it' its'.itemDB = its.itemDB ++ itemId -> it' it'.name = its.itemDB[itemId].name it'.count = plus[its.itemDB[itemId].count, quantity] } }pred execute[] {some disj its, its', its'': Inventory, itemId: ItemId, n: Name | { init[its] itemRegistration[its, its', itemId,100 , n] receivingOrShipping[its', its'', itemId, -50 ] } }run executefor 2 but3 Inventory,8 Int
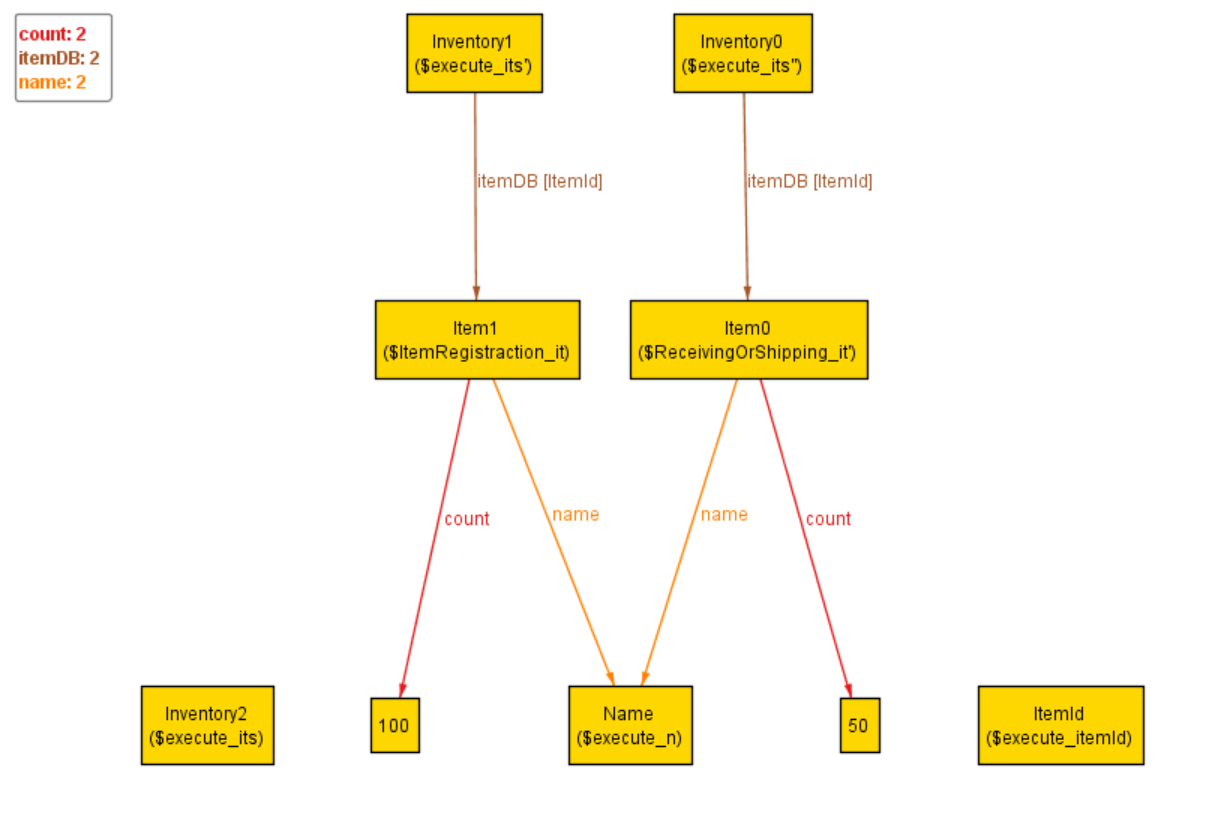
先ほどのInventoryManagementを,Alloyの可視化ツールを使用して,モデルを可視化した図が以下の通りになります.

Inventory が,商品名を表す name と在庫数を表す count の2つのフィールドを持っている,
Item を管理するというモデルになっています.
ここでは,InventoryManagementの仮想実行について説明します.InventoryManagementの仮想実行で用いるテストケースは次の通りです.
先ほどの仮想実行を可視化したものを以下に示します.

左下にあるInventory2($execute_its)は,始めに init が実行された時の状態になっているため,
まだ何の商品(Item)も登録されていない状態になっています.
次に,1番上の段の左にあるInventory1($execute_its')はテストケースの1が行われた時の状態になっているため,
100個のItem1を入荷している状態になっています.
そして,Inventory1の右にあるInventory0($execute_its'')ではテストケース2が行われた時の状態になっているため,
在庫数が50個に減少しています.
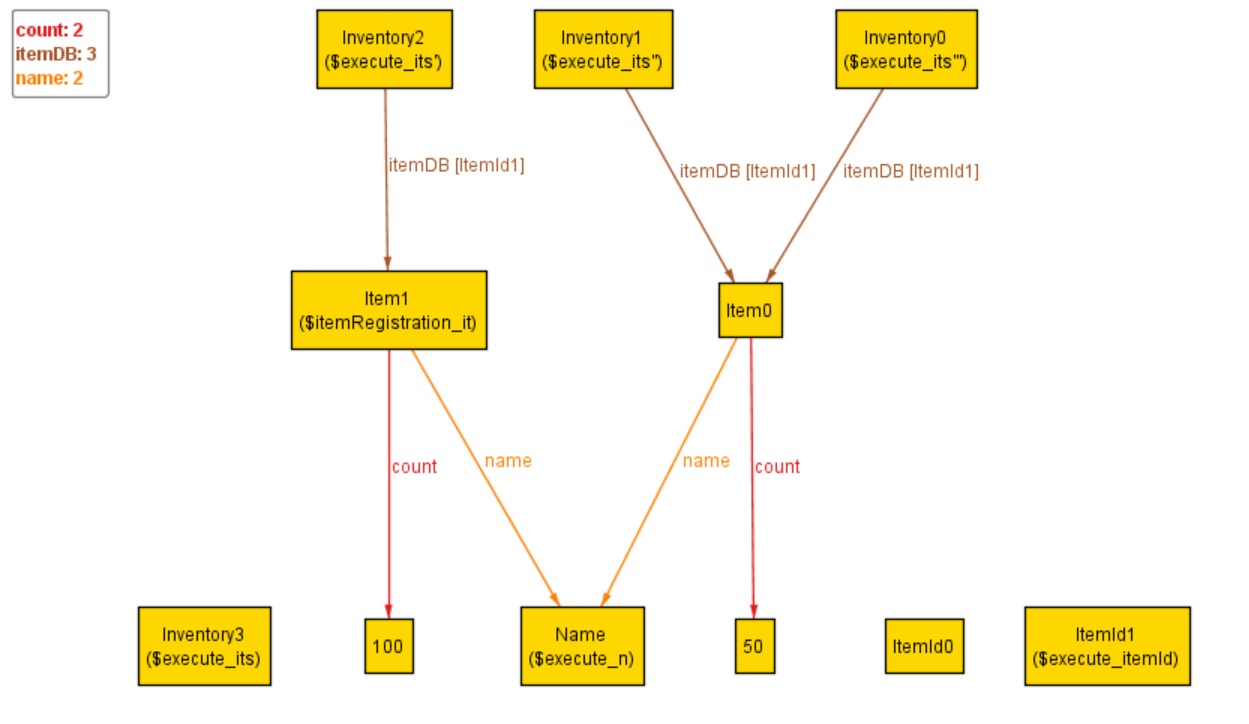
本課題ではまず,上記にて説明を行ったInventoryManagementに,とある機能を追加した時のモデルと可視化の図を
実験参加者の皆様に見て頂きます.
次に,その2つを見てどの様な機能が追加されたのか,またどの様なテストケースになっているのかを
考えて頂き,以下のアンケートにお答えください.
sig ItemId, Name{}sig Inventory { itemDB: ItemIdlone ->lone Item }sig Item { name : Name, count:Int }pred init[its: Inventory] {no its.itemDB }pred itemRegistration[its, its': Inventory, itemId: ItemId, quantity:Int , n: Name] {some it: Item | {no itemId2: ItemId | its.itemDB[itemId2] = it its'.itemDB = its.itemDB + itemId -> it it.name = n it.count = quantity } }pred shippingOrReceiving[its, its': Inventory, itemId: ItemId, quantity:Int ] { plus[its.itemDB[itemId].count, quantity] <0 implies {all itemId': ItemId | its'.itemDB[itemId'] = its.itemDB[itemId'] }else {some it': Item | {no itemId2: ItemId | its.itemDB[itemId2] = it' its'.itemDB = its.itemDB ++ itemId -> it' it'.name = its.itemDB[itemId].name it'.count = plus[its.itemDB[itemId].count, quantity] } } }pred execute[] {some disj its, its', its'', its''': Inventory, itemId: ItemId, n: Name | { init[its] itemRegistration[its, its', itemId,100 , n] shippingOrReceiving[its', its'', itemId, -50 ] shippingOrReceiving[its'', its''', itemId, -75 ] } }run executefor 2 but 4 Inventory,8 Int

課題アンケート (別タブが開きます)
課題終了後の評価アンケート (別タブが開きます)